
Many companies create custom innovative digital products, often using a highly customized specific sprint roadmap to get there. This makes for great products – but reimagining sprint roadmaps every time a new project comes around eats up considerable time and resources.
Recently, one of the project teams at Dialexa organically created a customizable, scalable sprint roadmap that’s allowed us to increase efficiency and collaboration and provide clients a window into the product creation process. This sprint roadmap is a universal solution flexible enough for any product creation scenario – and we’re excited to share this framework with the product-building community!
Here I’ll take you through the journey we took to create this artifact and give you step-by-step instructions for how to leverage it yourself on a variety of projects or initiatives.
THIS ADAPTABLE ROADMAP ALLOWS YOUR TEAM TO:
- ALIGN DESIGN AND DEVELOPMENT STRATEGIES
- PROVIDE HIGHLY SPECIFIC REFERENCES FOR JIRA SPRINT PLANNING, USER STORIES, AND FEATURE SETS
- SET REALISTIC EXPECTATIONS OF SCOPE AND FEATURE SET AVAILABILITY
- FOSTER CROSS-FUNCTIONAL AND DEPARTMENTAL COLLABORATION
- EFFICIENTLY ORGANIZE AND EXECUTE A LARGE AMOUNT OF WORK
FIRST, A LITTLE CONTEXT: THE ORIGIN STORY OF OUR UNIVERSAL SPRINT ROADMAP
Our project team was in the midst of creating a healthcare-based platform, website, and mobile app for a global enterprise. This team had just completed the MVP (Minimum Viable Product) and was preparing for Phase 2, which included the same users from MVP but added two more users.
At this time, the aforementioned sprint roadmap was not outlined as an expected deliverable. In fact, there was ambiguity regarding how to extract requirements for this new phase of work. Fortunately, the Dialexa research and design process is made for situations like this. Our team is well versed in extracting requirements, as well as creating and designing features from scratch.
Although in this scenario our team was primed with a variety of elements previously built from the MVP that we could utilize to get the Phase 2 process going, many organizations in the same boat may be starting from square one. Not to worry, the approach remains the same no matter the context. Every process begins with Discovery & Requirements.
Here is how to do it yourself.
DISCOVERY & REQUIREMENTS
STEP 1: VISUALIZE NAVIGATION AND INFORMATION ARCHITECTURE
Assuming users have already been identified and the product has been imagined, visualize how the users are to navigate through the product and assess how the information can be architected. You can start at a high-level, listing sections of user navigation. Even if you’re unsure of the specific features, a fundamental understanding of the product helps inform the types of actions users would be taking, and thus how they would get to those actions.
HOW DIALEXA DID IT
Our first tactic was to use the navigation panels built in MVP to help us outline and organize potential content into buckets. These navigation panels would also be used in the new users’ views, so we created lists of the sections to which these new users would navigate and their high-level goals for each section.

- Helped us frame content to create a lightweight information architecture
- Created high-level categories of user goals/product content
STEP 2: STORY MAPPING
Ideate on tasks the user will aim to complete in each of the navigation sections you outlined in step 1. Then, go one level further, into the specific activities that will allow them to accomplish those tasks and achieve their goals. Record each task or activity on its own “sticky note” so they can both be analyzed individually and be grouped with similar tasks.
HOW DIALEXA DID IT
With our content organized in buckets by navigation section, we took things one level further by noting specific tasks the users were aiming to accomplish, followed by the activities necessary to allow those tasks to be completed. Anything we anticipated a user to be able to do was added as a task or activity, which eventually became the product features. We did this same exercise for all four new user perspectives, for each respective navigation section outlined earlier.
- Helped us visualize the features
- Encouraged focus on the product vision
- Aligned teams on what we needed to create
STEP 3: PRIORITIZATION
Now you can start prioritizing tasks and activities to help build feature sets and determine the complexity of what you want to produce. Create a quadrant matrix, with one axis representing value to the product or business and the other representing effort to build. Plot each task or activity “sticky note” within this matrix. At the end, you can turn them into formal feature cards listing the topic, description, priority, and effort/value numbers.
HOW DIALEXA DID IT
An abundance of task and activity stickies were now ready to be assessed and prioritized.. We plotted our “proto-features” on our matrix, with one axis representing value to the app and the other, how much effort it will take to code that feature. Collaborating with leadership, engineers, and designers, we collectively assessed and plotted over 150 features amongst the four user perspectives in just a few collaboration sessions. The original task/activity stickies became prioritized feature cards that served as a way to later categorize all features and functionalities across the four user views.
- Prioritized features to help design and development begin build estimation
- Condensed multiple user activities/tasks into singular features
ORGANIZATION & IMPLEMENTATION
STEP 4: ORGANIZE AND CATEGORIZE FEATURE CARDS
Create groupings of feature cards based on subject or topic to assess the quantity of requirements. You may also organize by user (if you have multiples), but categorizing by feature topic is your best bet to visualize which topics require significant time and effort so you may allocate time appropriately and begin building earlier.
HOW DIALEXA DID IT
The heavy lifting of workshopping to extract and define requirements was completed, but now we had 150 features to strategically map and plan. Mapping was crucial for getting client stakeholders approval, as well as figuring out the most efficient way for our design and engineering teams to work in unison to build the product in a specific timeframe.
At this point, the concept of the eventual roadmap was not yet in mind, rather we were still in the mode of just logically stacking one exercise after another. Even though all the features were now defined, there were a large number of those features that were duplicated across our four new user perspectives. To account for this overlapping of features between user types, as well as allow us to see the quantity of requirements by feature subject, we organized features by user and subject.
STEP 5: MEASURE, DIVIDE, AND CONQUER
Structure the work in sprints, dividing up work based on which elements require the most time and/or effort to design and develop. Utilizing the organization and categorization from Step 4, determine which feature card categories or users are more important to the fundamental functionality of your product. Schedule bigger or more complex elements earlier to give your team ample time for completion and to make eventual iterations.
HOW DIALEXA DID IT
Here is where the elements of the roadmap started to manifest. We created a simple bar chart to measure the quantity of work by feature subject, also including user perspectives for those subject categories. Now we could quickly identify areas that required more effort and importance, thus allowing us to outline the timeframe required to design the features of one subject category vs. another.
Knowing we had at least three or four sprints ahead of us to complete the designs, we divided the work into those respective sprints to optimize our efforts and allow engineering a manageable amount of time to complete the development.
- Quickly identified areas requiring more effort and importance
- Fostered a collaborative, optimized approach to upcoming work
STEP 6: IMPLEMENTATION
This is where everything is puzzle-pieced together, and if your team has followed the steps above, the framework will universally apply, no matter the subject matter. At a high-level you can implement all the previous elements into the roadmap starting with the sprints, feature categories, users involved, and finally, prioritized features. Ideally, it’s most effective to plan 3-4 sprints at a time, but the framework can be extended or condensed for any theoretical time frame.
HOW DIALEXA DID IT
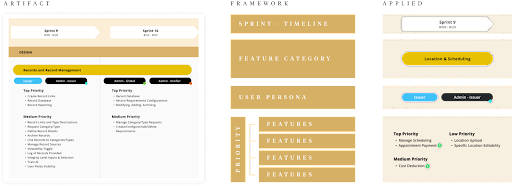
After conversations about approach and manageable sprint expectations, we combined all previous findings with the divided estimate of work to create the sprint roadmap. The structure is as follows from top to bottom:
- A timeline with outlined sprints
- Feature categories by subject
- User persona perspectives who would be using those features
- A list of the specific features to be created, from top to medium to low priority
Below is a portion of the overall artifact to give an idea of how the framework and content are combined together to create the sprint roadmap.
- A defined course of action for the upcoming sprints
- Stakeholder approval and buy-in
- A new, universal artifact that can be repurposed
A SPRINT ROADMAP TO GET YOU STARTED
ABOUT THE AUTHOR

Sanjay Shah, Senior Product Designer, is an ambitious and innovative designer who thrives on challenges that require taking the road less traveled. With a background in sports and athletics, which shape his ability to approach design from alternate perspectives by applying preparation and game-planning tactics to research and design, Sanjay establishes unique work that represents the values and needs of all users and clients. Sanjay is the leader behind Dialexa EDU, a mentorship program for aspiring product designers and engineering students.
Connect with Sanjay on LinkedIn